Appium Setup
Intro
Appium is an open-source test automation framework for use with native, hybrid, and mobile web apps. It drives iOS, Android, and Windows apps using the WebDriver protocol.
You can run VIVIDUS automated scenarios on mobile devices using Appium tool.
Install Appium server
Since Appium has a Client/Server Architecture, it is required to install and run Appium server to perform mobile tests.
There are two ways of installing Appium server:
Application installation (Appium Desktop)
Appium Desktop is a GUI wrapper around the Appium server that can be downloaded for any platform. It comes bundled with everything required to run the Appium server, so you don’t need to worry about Node.
Download the latest version of Appium Desktop.
Command line installation
Appium is a server written in Node.js. It can be built and installed from source or installed directly from NPM:
npm install -g appiumTo run Appium use the command:
appiumEnvironment setup
Make sure you have installed:
And the following environment variables are set:
-
JAVA_HOME
-
ANDROID_HOME
| You can open "Edit configuration" to set the variables in Appium Desktop. |
Appium-Doctor (Optional)
Appium-Doctor diagnoses, reports and fixes common Node, iOS and Android configuration issues before starting Appium. It helps to make sure you have everything to start using Appium.
Appium-doctor checks for:
-
Android:
-
Android sdk exists and configured properly;
-
Environment variables and path check;
-
-
iOS:
-
XCode is installed (with command line tools);
-
Dev tools security check;
-
Auth check;
-
Node binary check;
-
Appium Capabilities
Desired Capabilities are just a set of keys and values that get sent to the Appium server during session initialization, that tell Appium what kind of thing we want to automate. The minimum set of required capabilities for any Appium driver should include:
-
platformName: the name of the platform to automate
-
platformVersion: the version of the platform to automate
-
deviceName: the kind of device to automate
-
app: the path to the app you want to automate (but use the browserName capability instead in the case of automating a web browser)
-
automationName: the name of the driver you wish to use
There are lots of other capabilities. To find out more please see Appium Capabilities Documentation.
Setting capabilities in VIVIDUS
Before running VIVIDUS scenarios it is necessary to pass Desired Capabilities to Appium Server. Use them as properties with selenium.grid.capabilities. prefix. Then just put these capabilities into the appropriate *.properties file. Please see examples below:
Basic properties
selenium.grid.capabilities.platformName=iOS
selenium.grid.capabilities.platformVersion=15.5
selenium.grid.capabilities.deviceName=iPad Pro (9.7-inch)
selenium.grid.capabilities.automationName=XCUITest
selenium.grid.capabilities.app=/Users/myDirectory/application.ipaselenium.grid.capabilities.platformName=android
selenium.grid.capabilities.platformVersion=11.0
selenium.grid.capabilities.deviceName=Pixel 6
selenium.grid.capabilities.automationName=UIAutomator2
selenium.grid.capabilities.app=/Users/myDirectory/application.apkAppium Inspector (Optional)
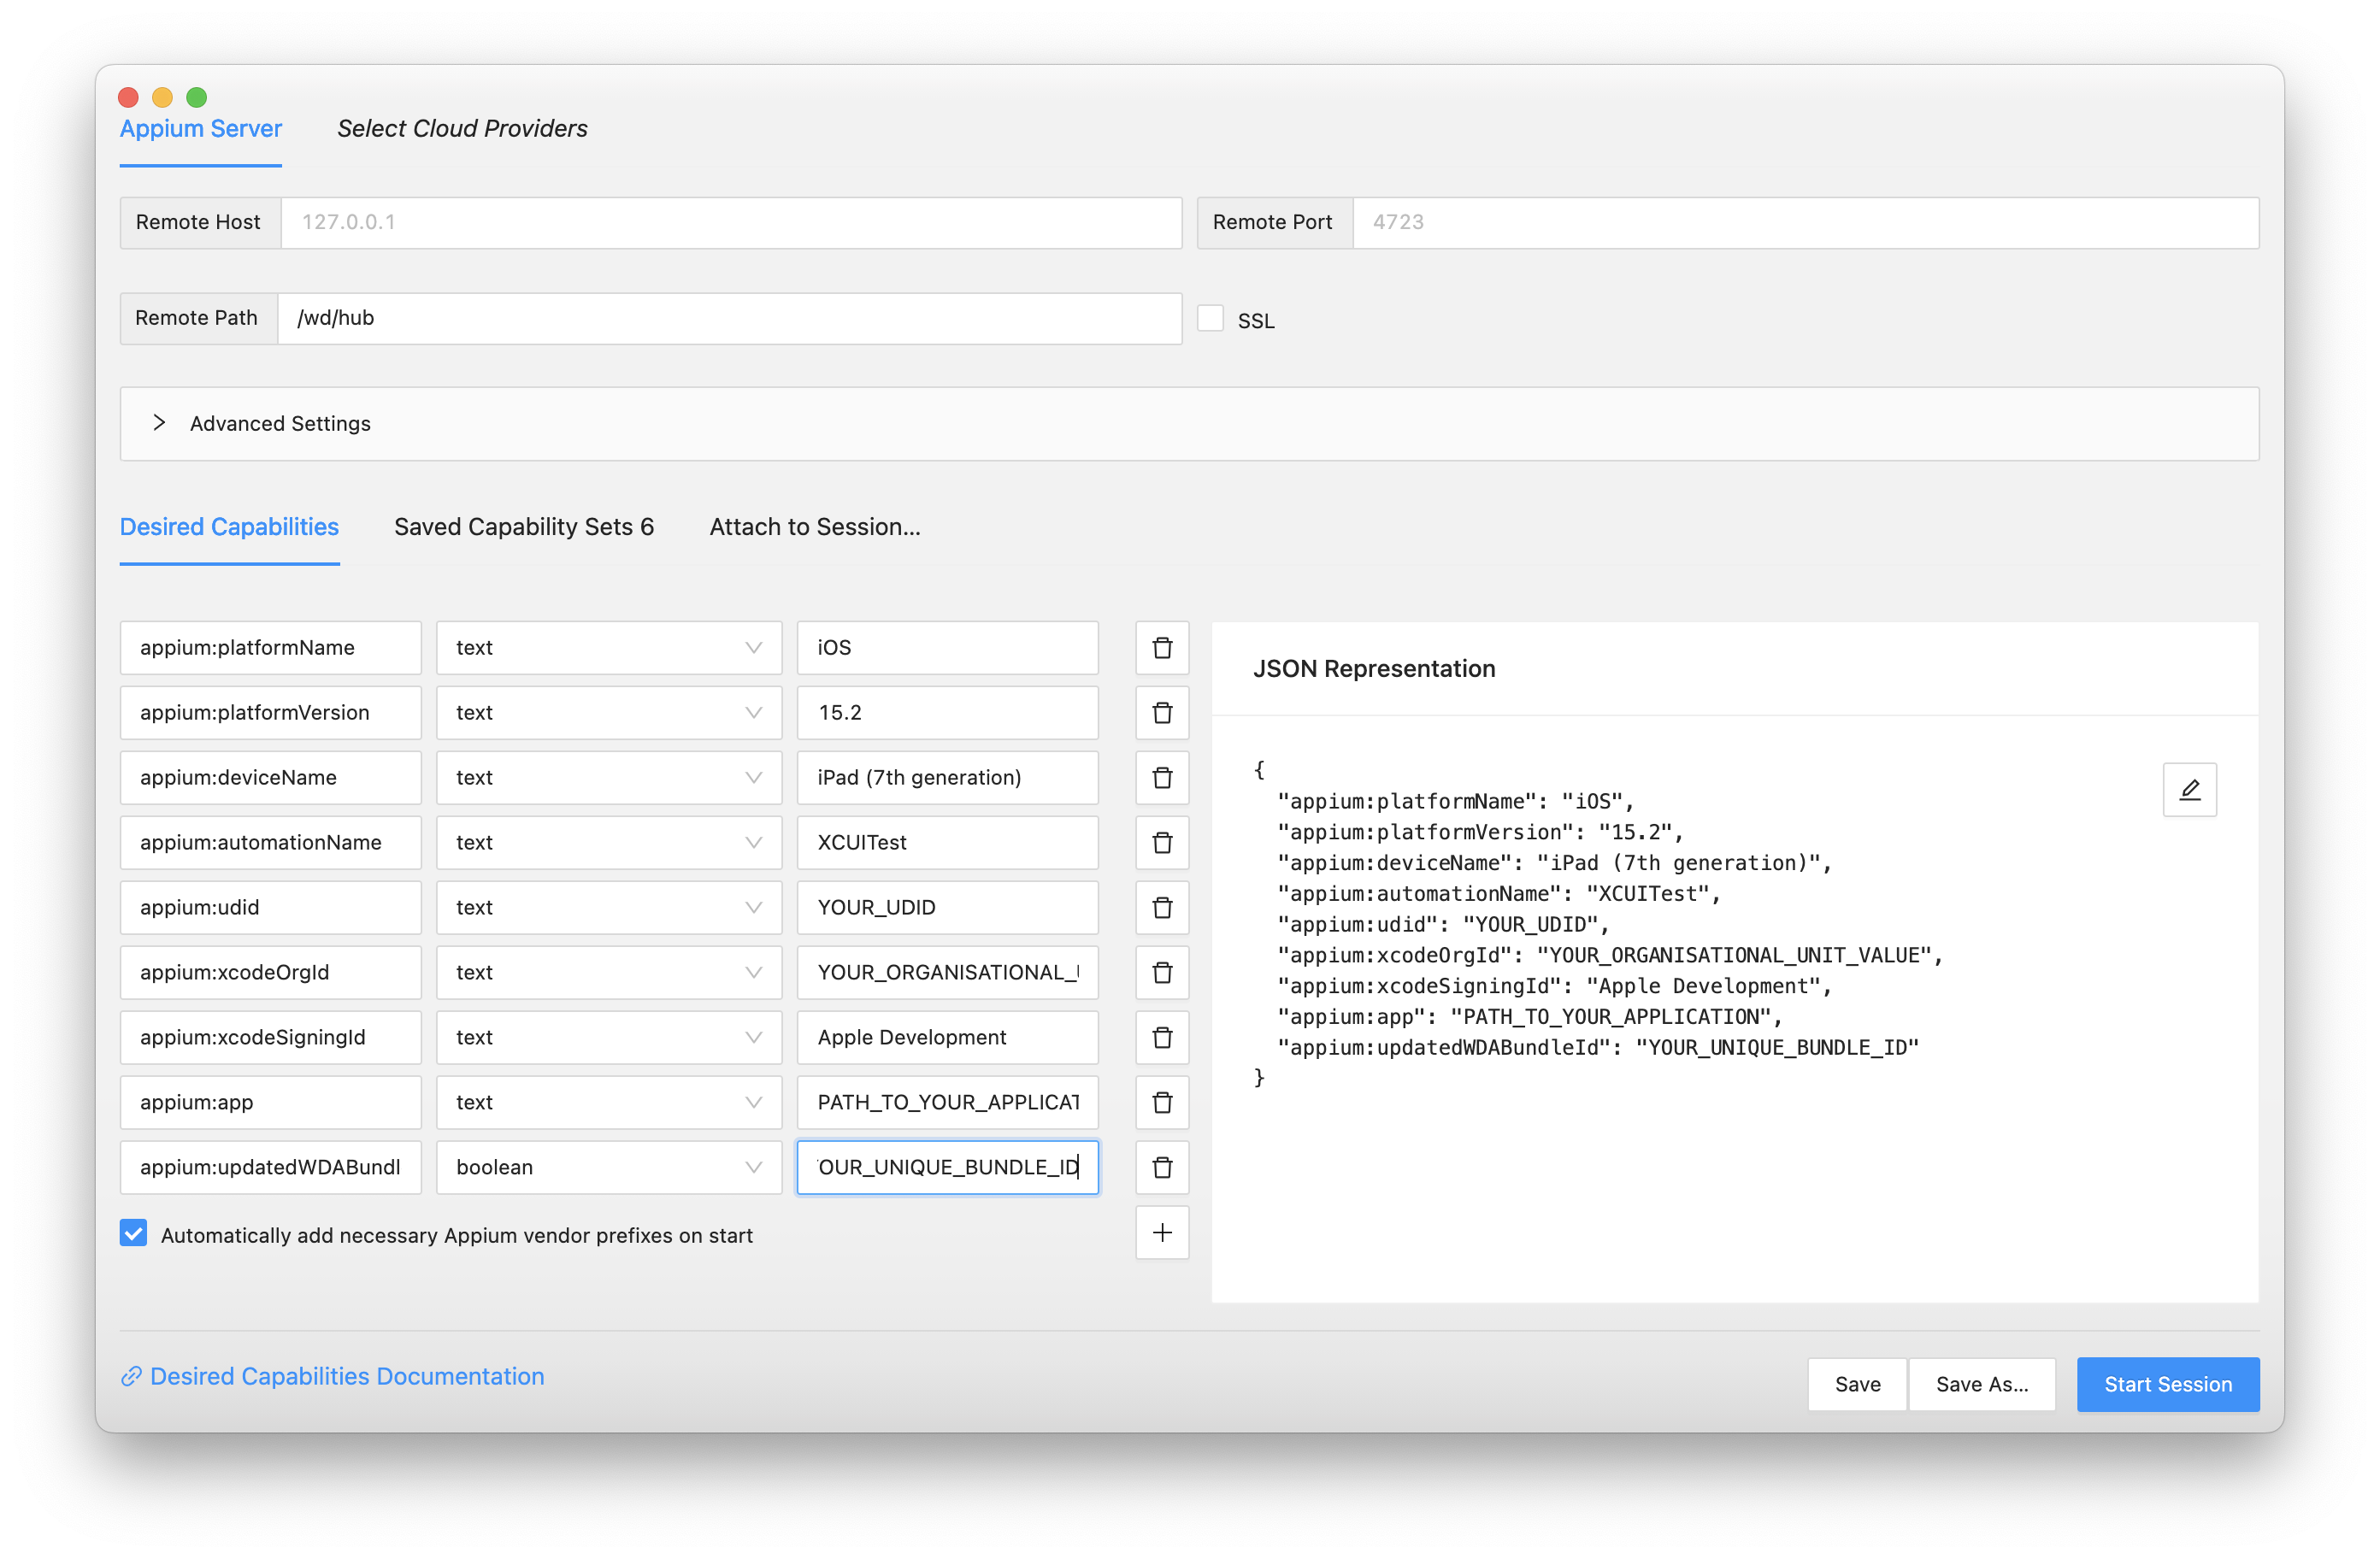
Appium Inspector is basically just an Appium client with a user interface. It allows to interact with application elements and Appium commands in a user friendly way. You can get the latest version of Inspector application following the link.
Click to view capabilities set up in Inspector

Running tests on Simulator/Emulator
VIVIDUS Sample Tests is a GitHub repository. Its purpose is to demo VIVIDUS capabilities via sample tests.
Let’s use it as an example for running mobile tests via Appium.
-
Assumptions
You have installed and properly set up the following:
-
IDE
-
Appium Server
-
AVD Manager (Android)
-
Simulator application (iOS)
-
-
Cloning and importing the repository
Clone vividus-sample-tests project using the following command:
git clone --recursive git@github.com:vividus-framework/vividus-sample-tests.gitThen use this detailed guide to proceed with importing and building the project.
-
Overriding properties
Since we are only interested in the mobile application story, add the following properties to the overriding.properties file. Choose one of the platforms and make sure properties match with your simulator set up.
Click to expand overriding.properties
Example 3. Minimum iOS setupselenium.grid.capabilities.appiumVersion=1.20.2 selenium.grid.url=http://127.0.0.1:4723/wd/hub configuration.profiles=mobile_app/ios configuration.suites=mobile_app/ios configuration.environments= selenium.grid.capabilities.deviceName=iPad Pro (9.7-inch) selenium.grid.capabilities.platformName=iOS selenium.grid.capabilities.automationName=XCUITestExample 4. Minimum Android setupselenium.grid.capabilities.appiumVersion=1.20.2 selenium.grid.url=http://127.0.0.1:4723/wd/hub configuration.profiles=mobile_app/android configuration.suites=mobile_app/android configuration.environments= selenium.grid.capabilities.deviceName=Lenovo selenium.grid.capabilities.platformName=android selenium.grid.capabilities.automationName=UIAutomator2 -
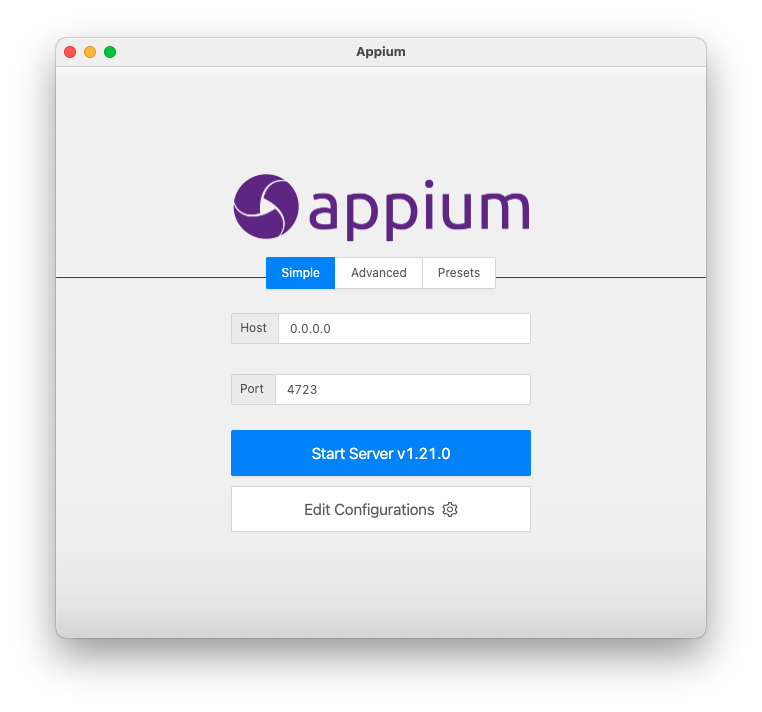
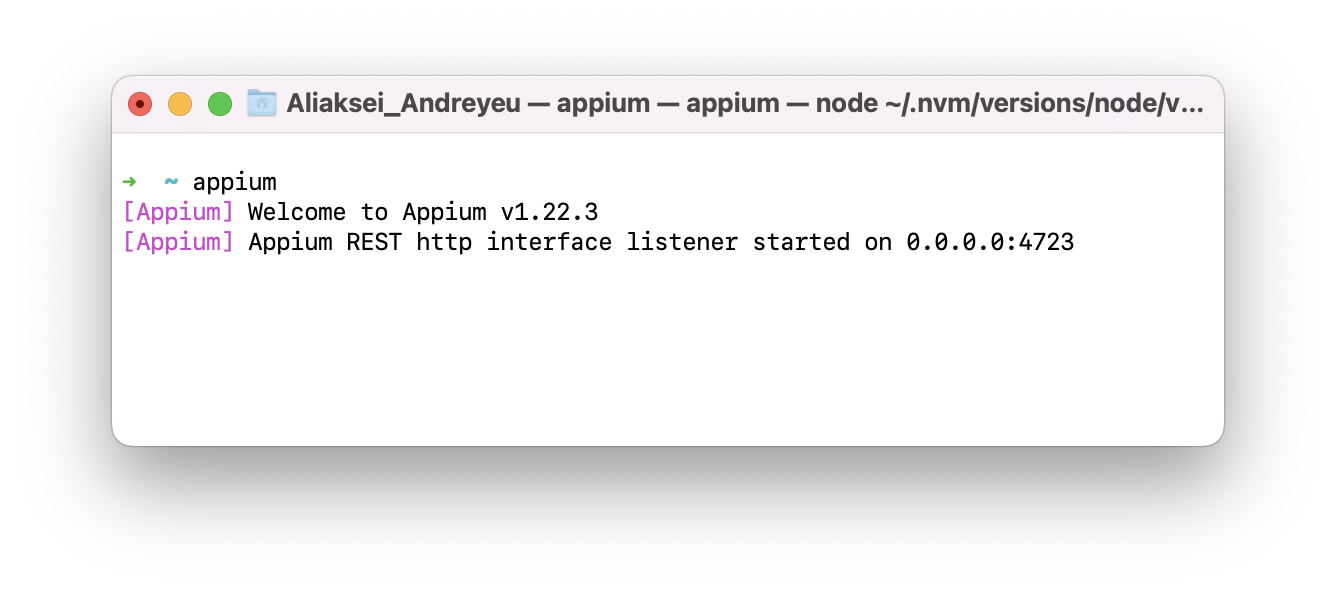
Start Appium Server
Make sure Appium Server is started.
Click to view screenshots
Appium-Desktop

Appium in the terminal
-
Tests execution and expected results
Execute the test either via
./gradlew runStoriescommand or by clicking theRunbutton in the IDE.In case everything has been set up correctly you will see the following:
-
Appium creates a new session;
-
Testing application (Swag Labs Mobile) is installed on the simulator;
-
Application is started;
-
Credentials are entered into username and password fields;
-
After successful login user sees the landing page;
-
Running tests on Real Devices
Executing tests on real devices has some features and required different preparations depending on the platform.
Android
Firstly, make sure you have installed Android Debug Bridge. Simply enter in the command line adb --version. You should get some adb information in the output:
adb --version
Android Debug Bridge version 1.0.41
Version 31.0.3-7562133
Installed as /usr/local/bin/adb
Android device UDID
Connect the device you want to interact with to your workstation. Use adb devices command to see the list of connected devices:
adb devices
List of devices attached
UKjeCe9Mr9 device
In this example UKjeCe9Mr9 is the unique identifier of the device. Use that number as a udid capability (property) in VIVIDUS:
selenium.grid.capabilities.udid=UKjeCe9Mr9You are ready to run tests! Just add this property to your *.properties file and use the same approach as for Emulators
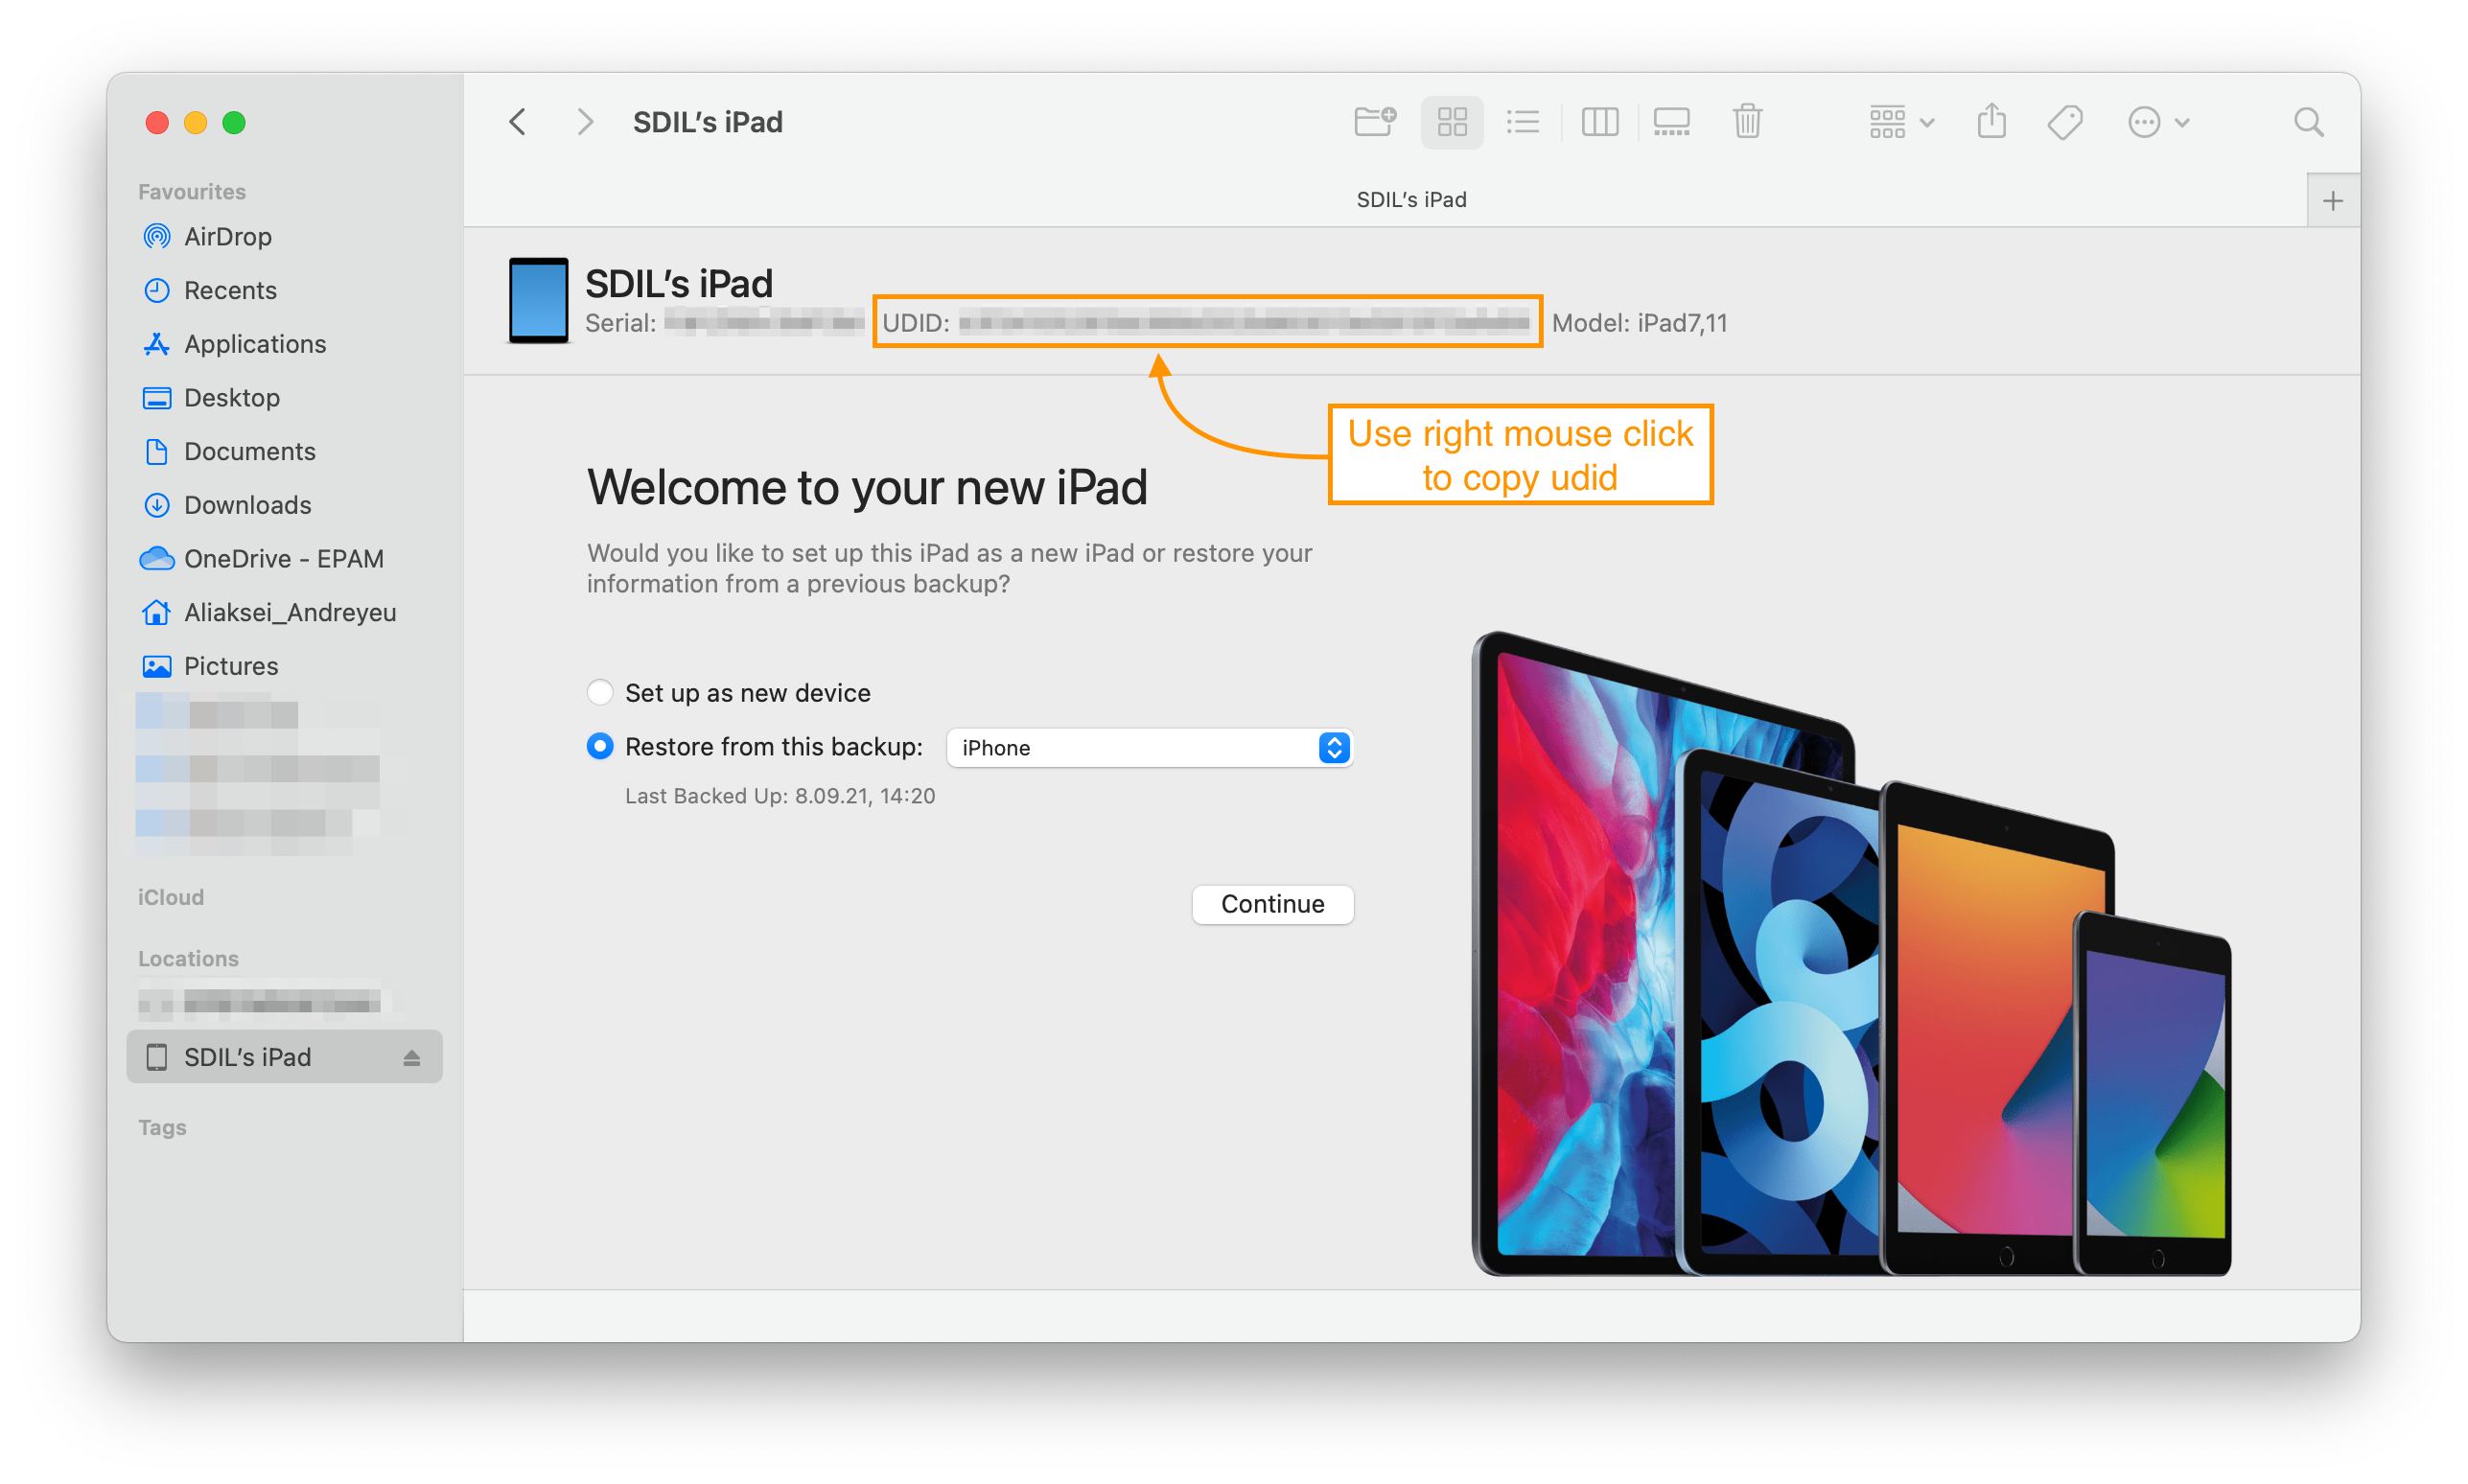
iOS
Automating a real device with XCUITest Driver(iOS) is considerably more complicated, due to Apple’s restrictions around running apps on real devices.
XCUITest driver installs a helper application called WebDriverAgent-Runner onto the device, and handles the application under test via it. While this is simple in theory, the hoops of code signing and provisioning applications for development and testing can make this a bit of a headache.
WDA configuration
There are two approaches for WebDriverAgent configuration:
-
Automatic WDA configuration. Proper work of the WDA requires signing it with a valid Apple Developer account. If you have a paid Apple Developer account, please see the following instructions on Appium Doc;
-
Manual WDA configuration. Using a "Free" developer account often leads to issues with the impossibility of creating a wildcard provisioning profile for the default application bundle.
Follow the instructions below to handle this issue.
Manual WDA configuration
| The next steps are based on Appium manual configuration doc. |
-
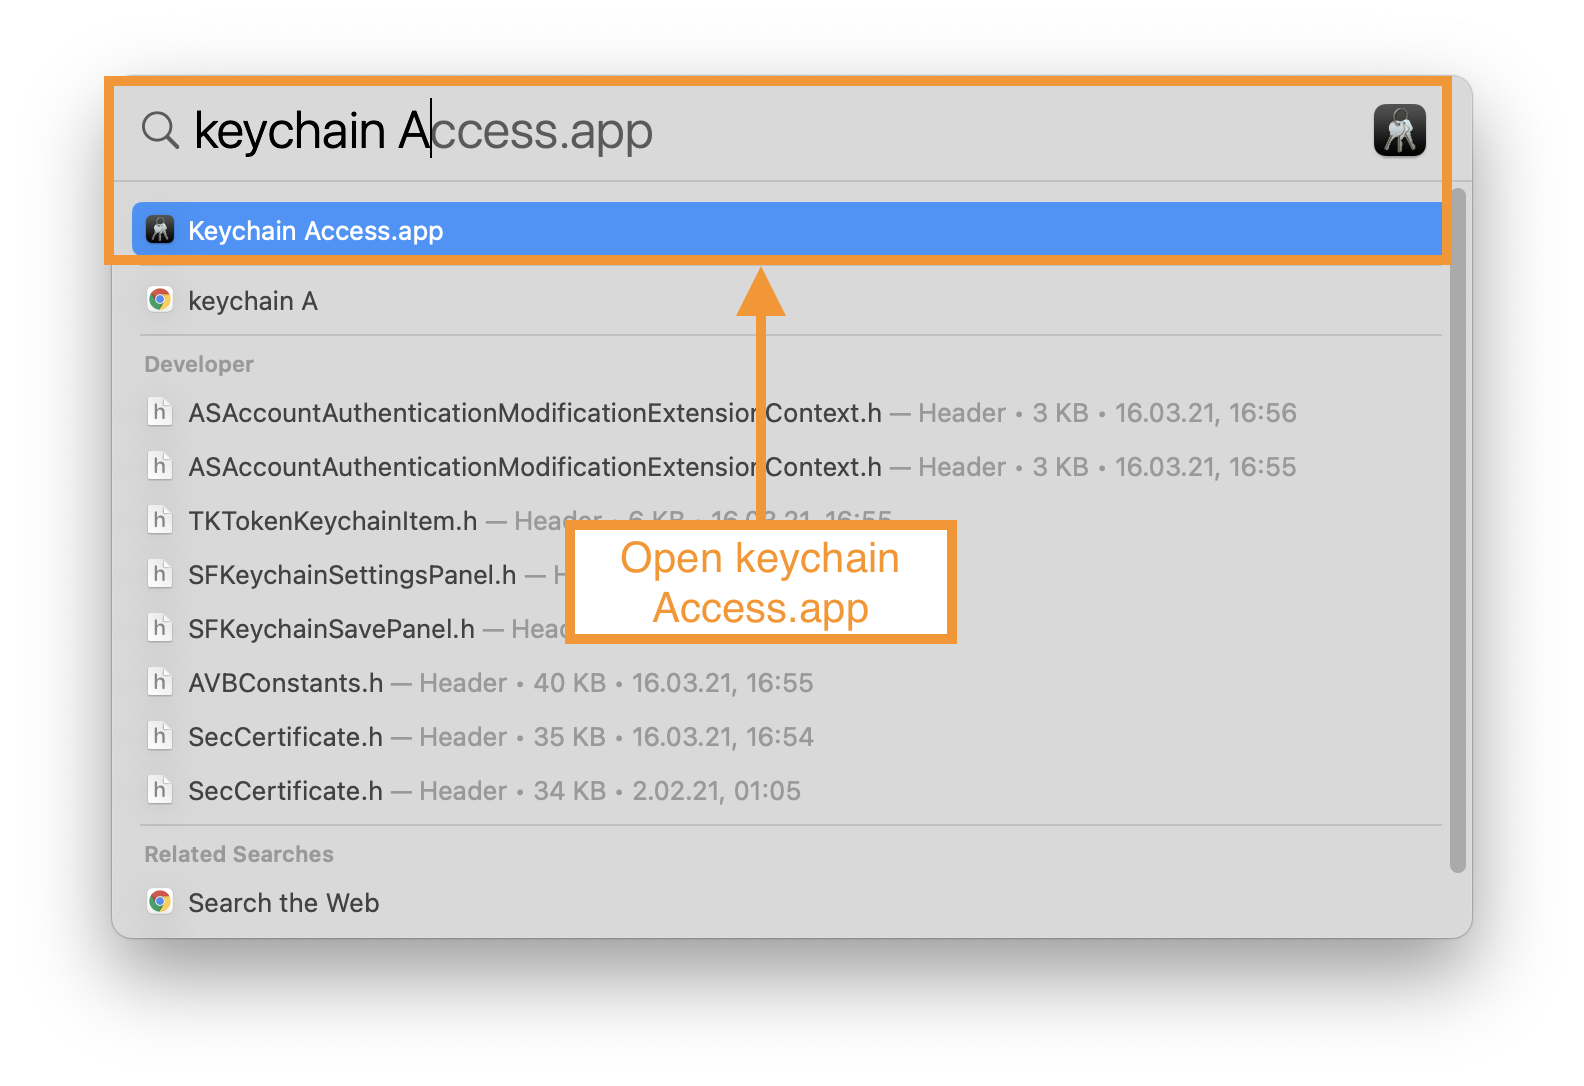
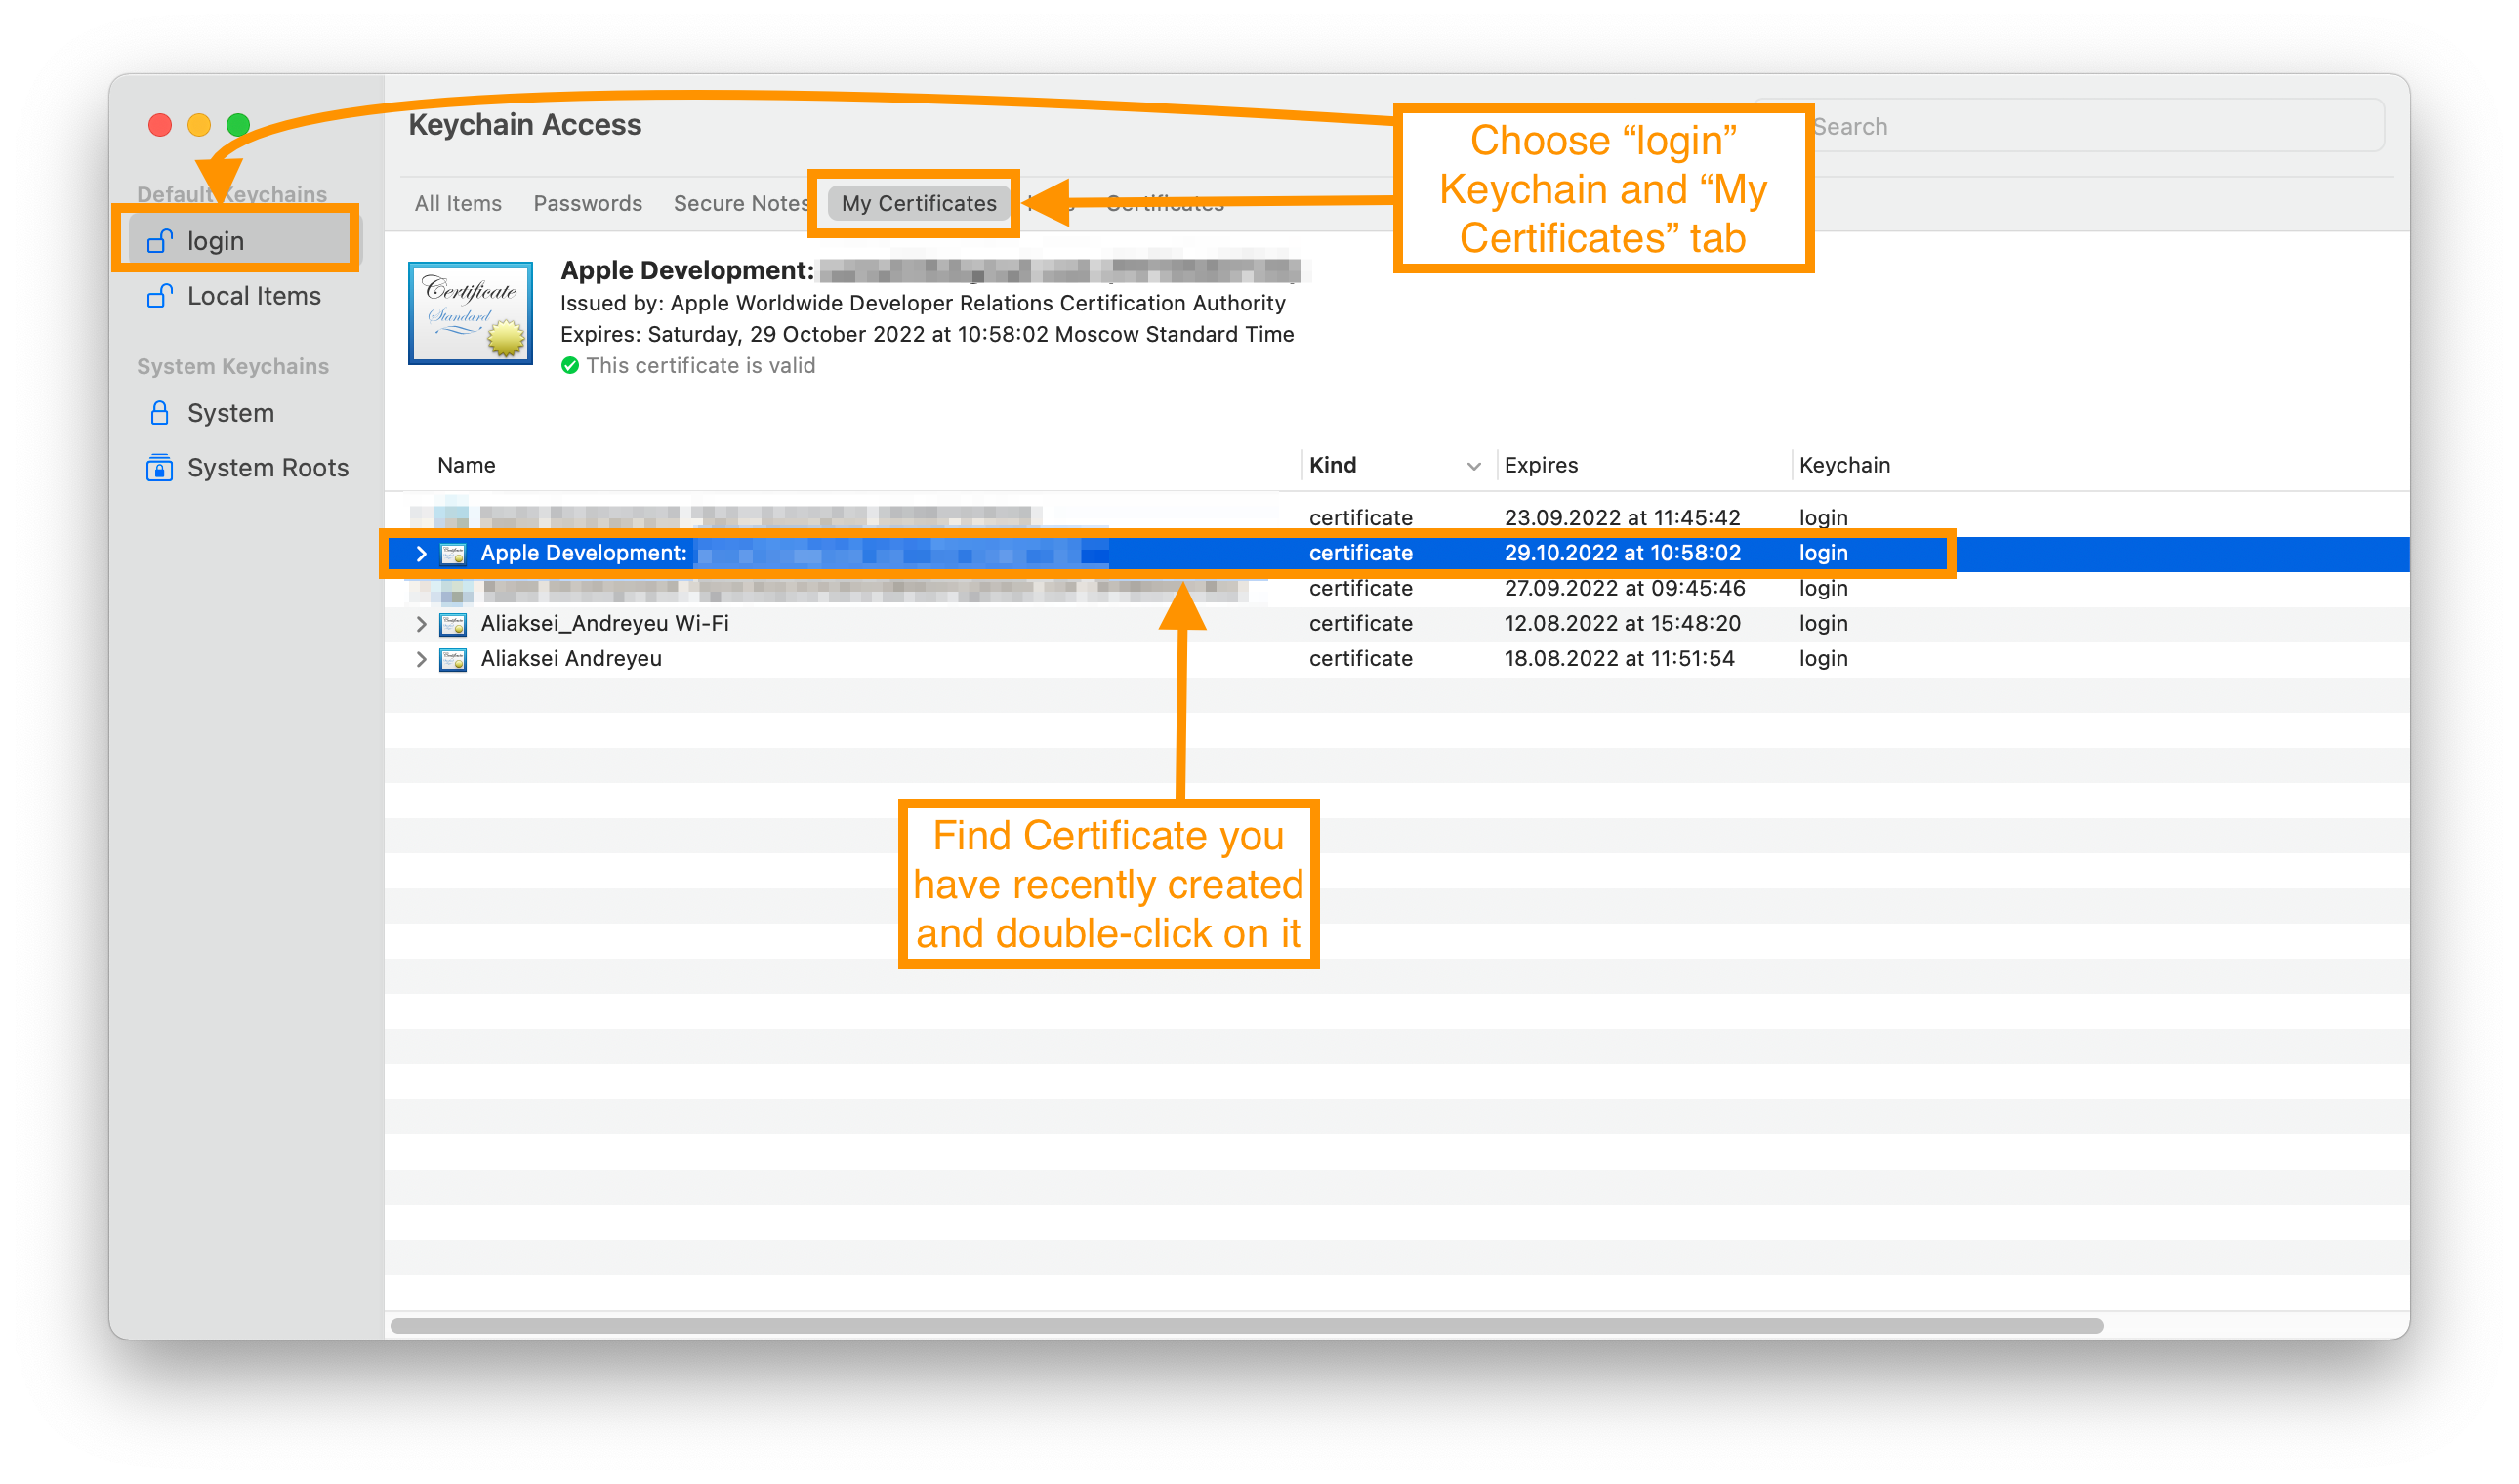
Add a new Apple Development Certificate for your Apple ID;
Click to see details
Open Xcode and go to settings
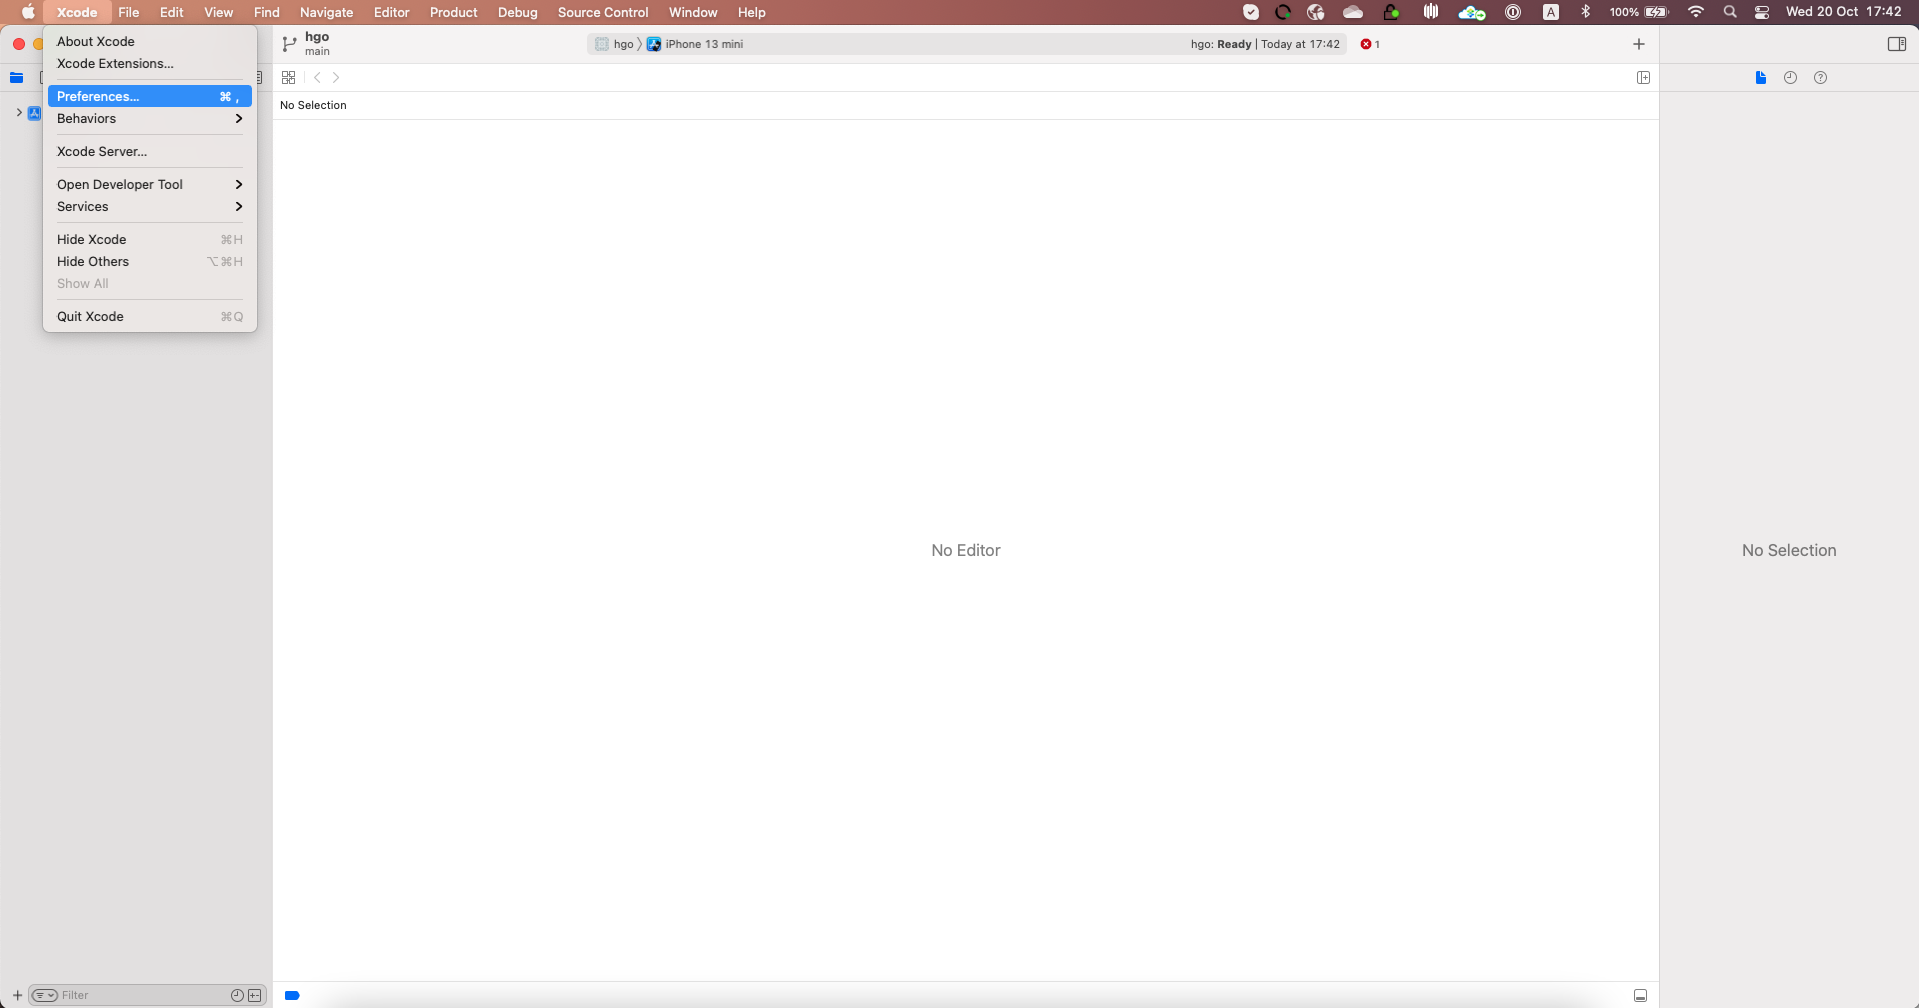
Click "+" to add an account and then Sign In with your Apple ID
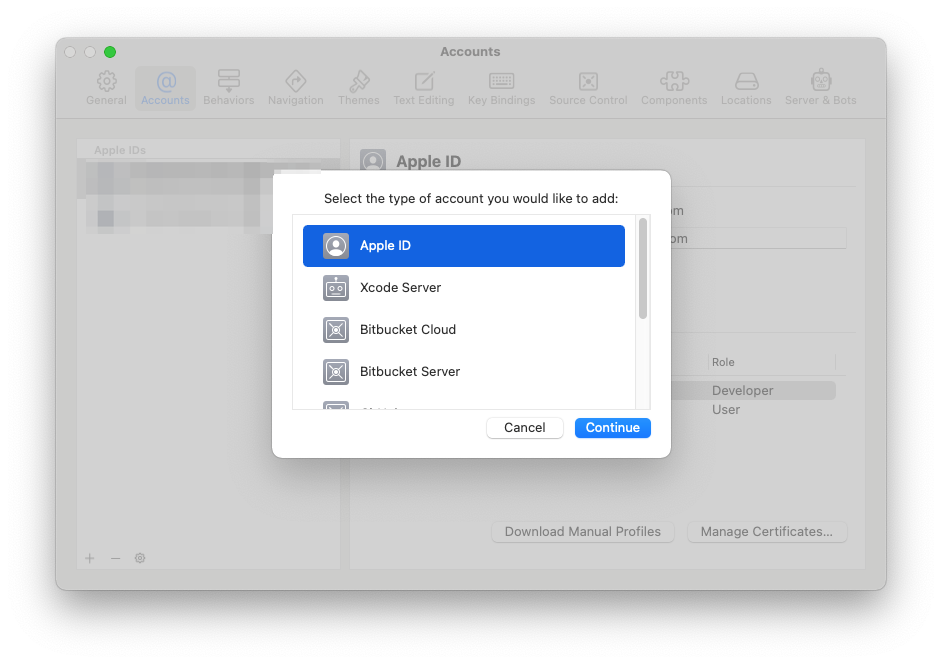
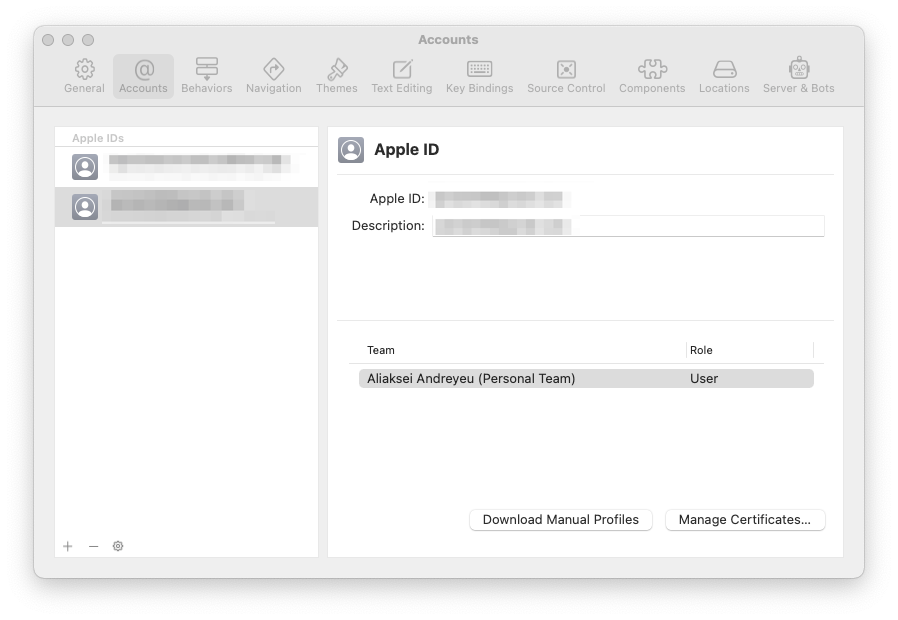
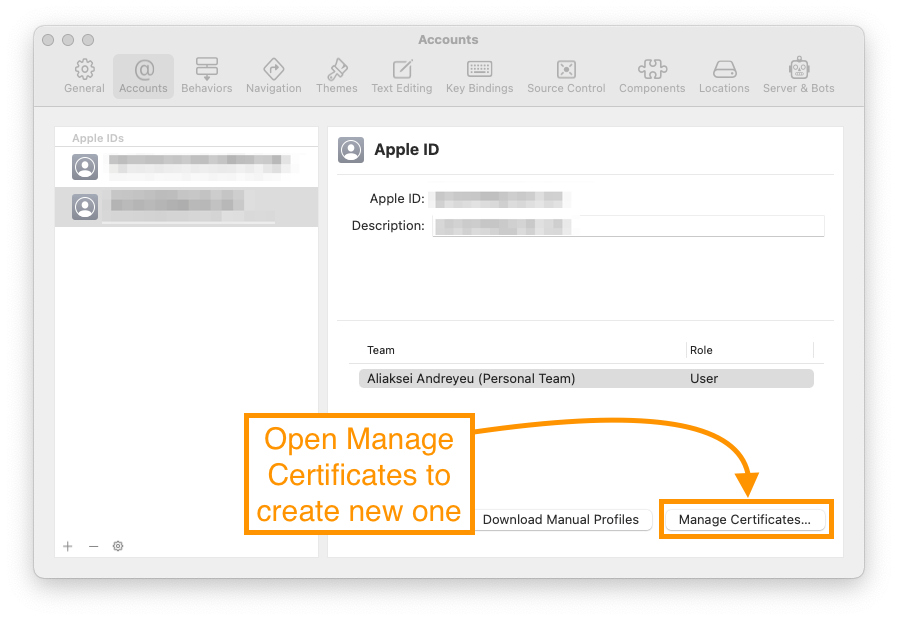
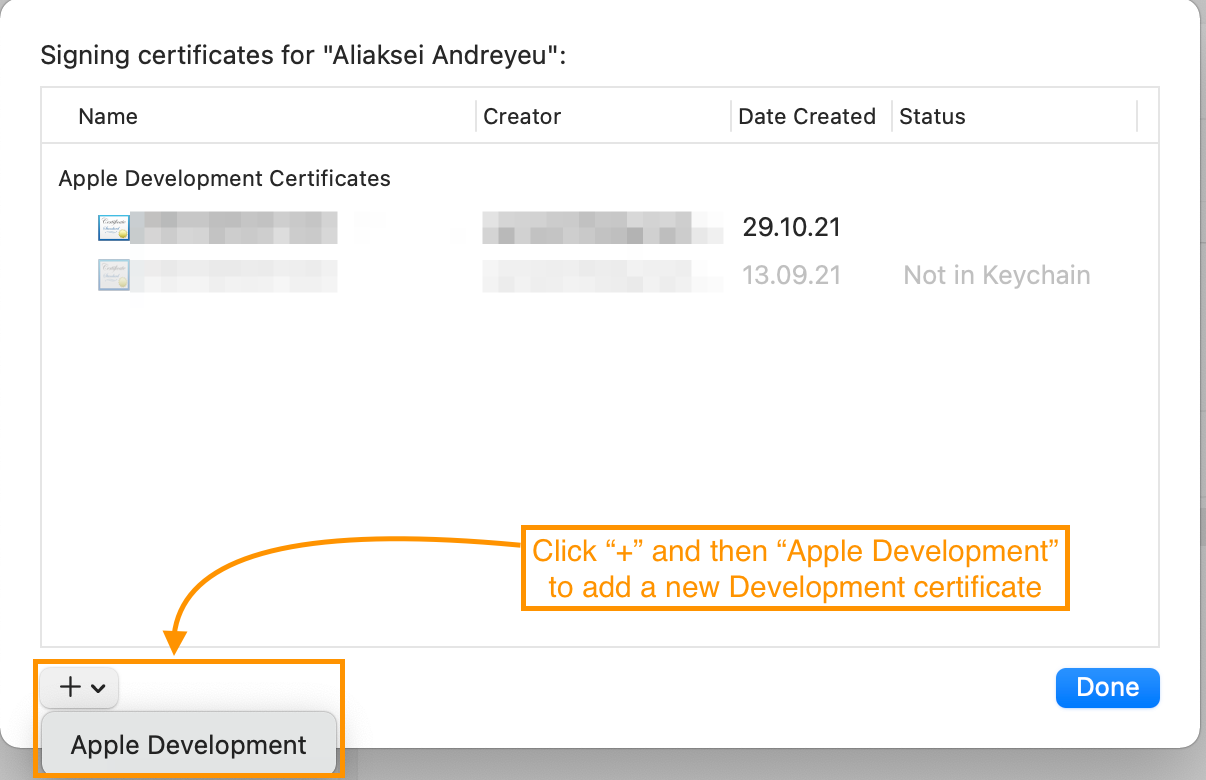
Add a new Apple Development Certificate
-
Build WebDriverAgent signed with your newly created certificate;
-
Open WDA project in Xcode;
Most common path to the project: /Applications/Appium.app/Contents/Resources/app/node_modules/appium/node_modules/appium-webdriveragent/WebDriverAgent.xcodeproj -
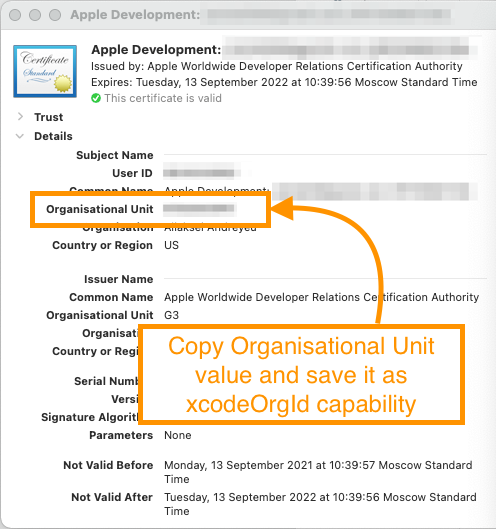
Come up with your unique Bundle Identifier. Use it for updating build parameters.
Click to see details
Make sure you’ve chosen correct device and parameters image::appium-check-device-and-parameters.png[]
Create your unique BundleId and update build parameters image::appium-update-build-parameters.png[]
-
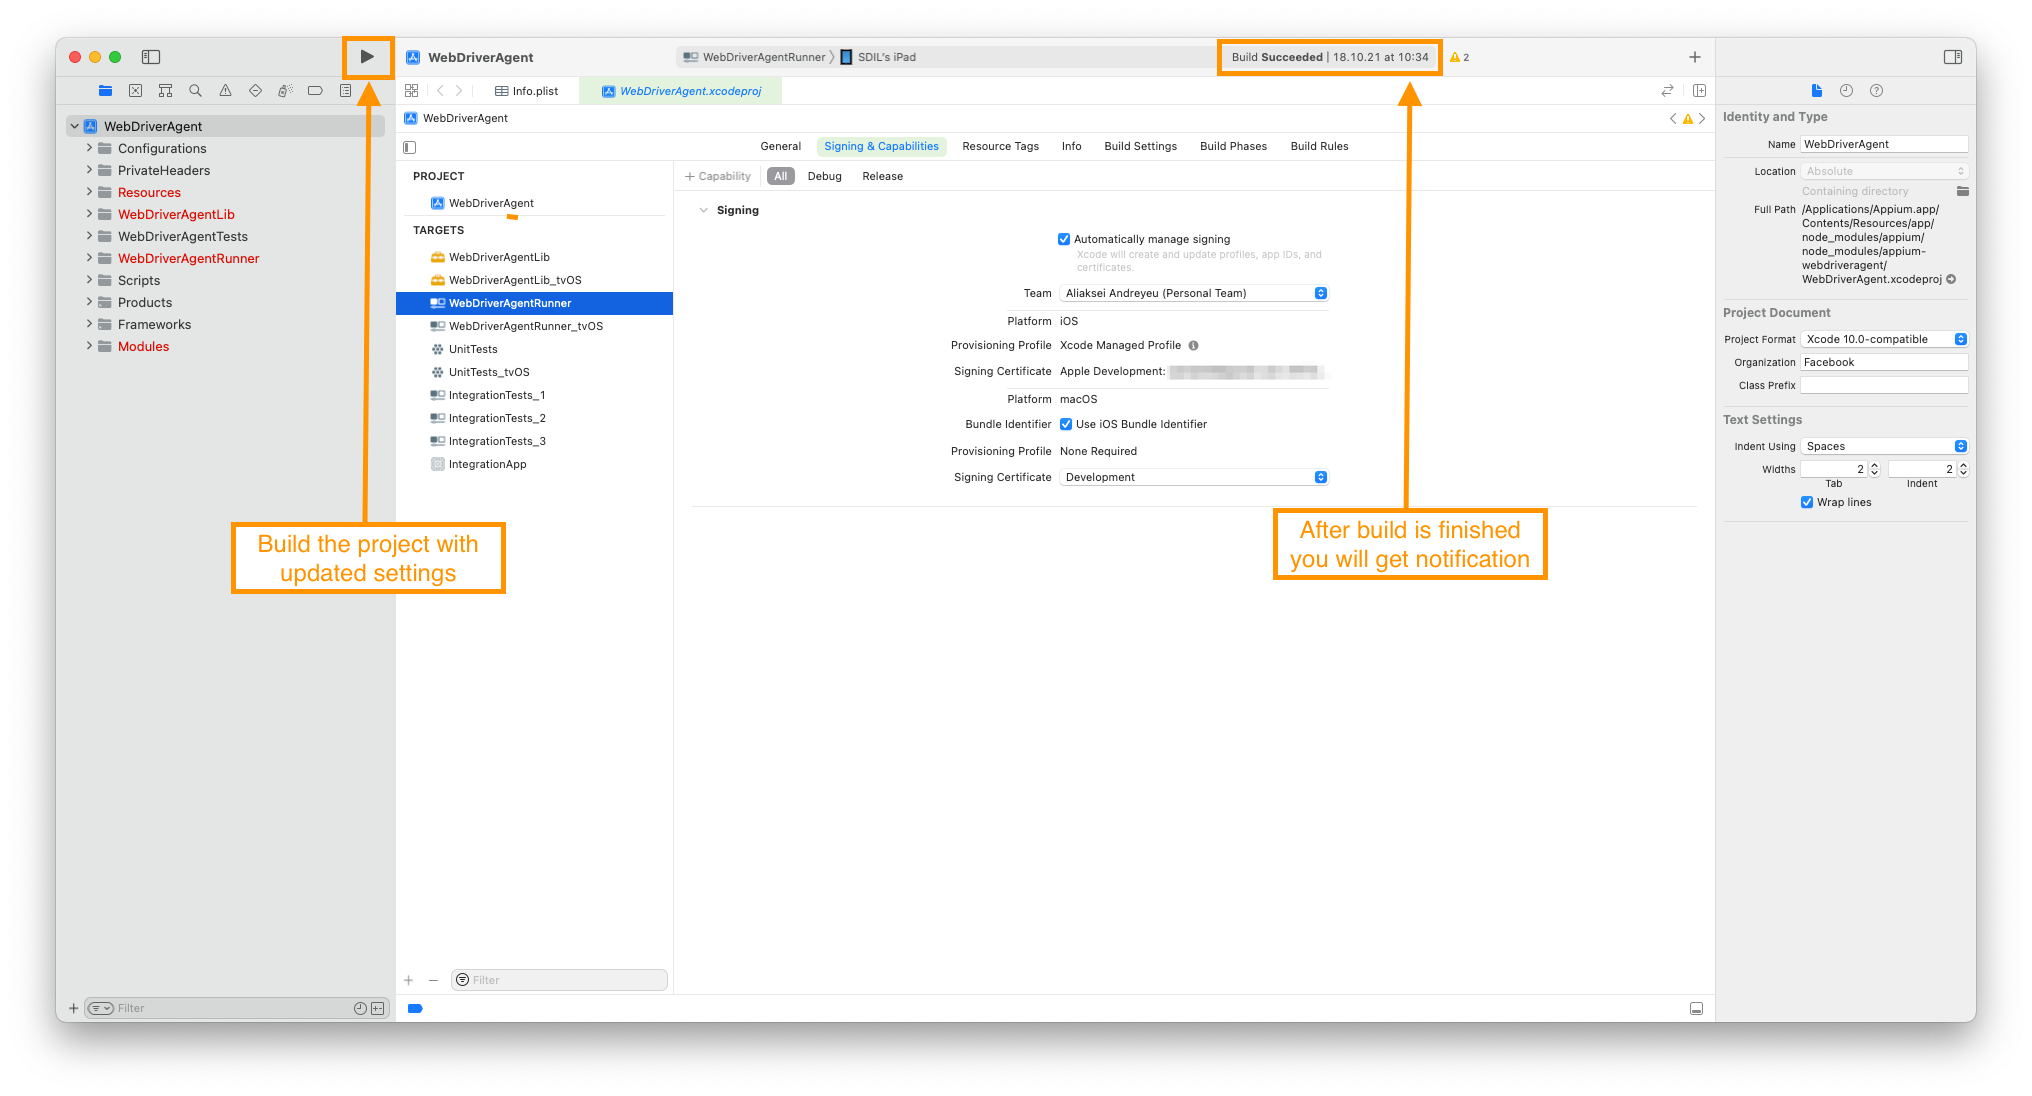
Build the project
Click to see details
-
Define properties for running a real apple device
# iOS
selenium.grid.capabilities.xcodeSigningId=Apple Development(1)
selenium.grid.capabilities.udid=b3f34105281bb345p980p824401d5913f13efe81(2)
selenium.grid.capabilities.xcodeOrgId=5H8S64Q9G4(3)
selenium.grid.capabilities.updatedWDABundleId=yourUniqueBundleId.WebDriverAgentRunner(4)| 1 | xcodeSigningId
For any Apple device use |
| 2 | UDID
|
| 3 | xcodeOrgId
|
| 4 | updatedWDABundleId
Use your unique Bundle Identifier that was created previously as |

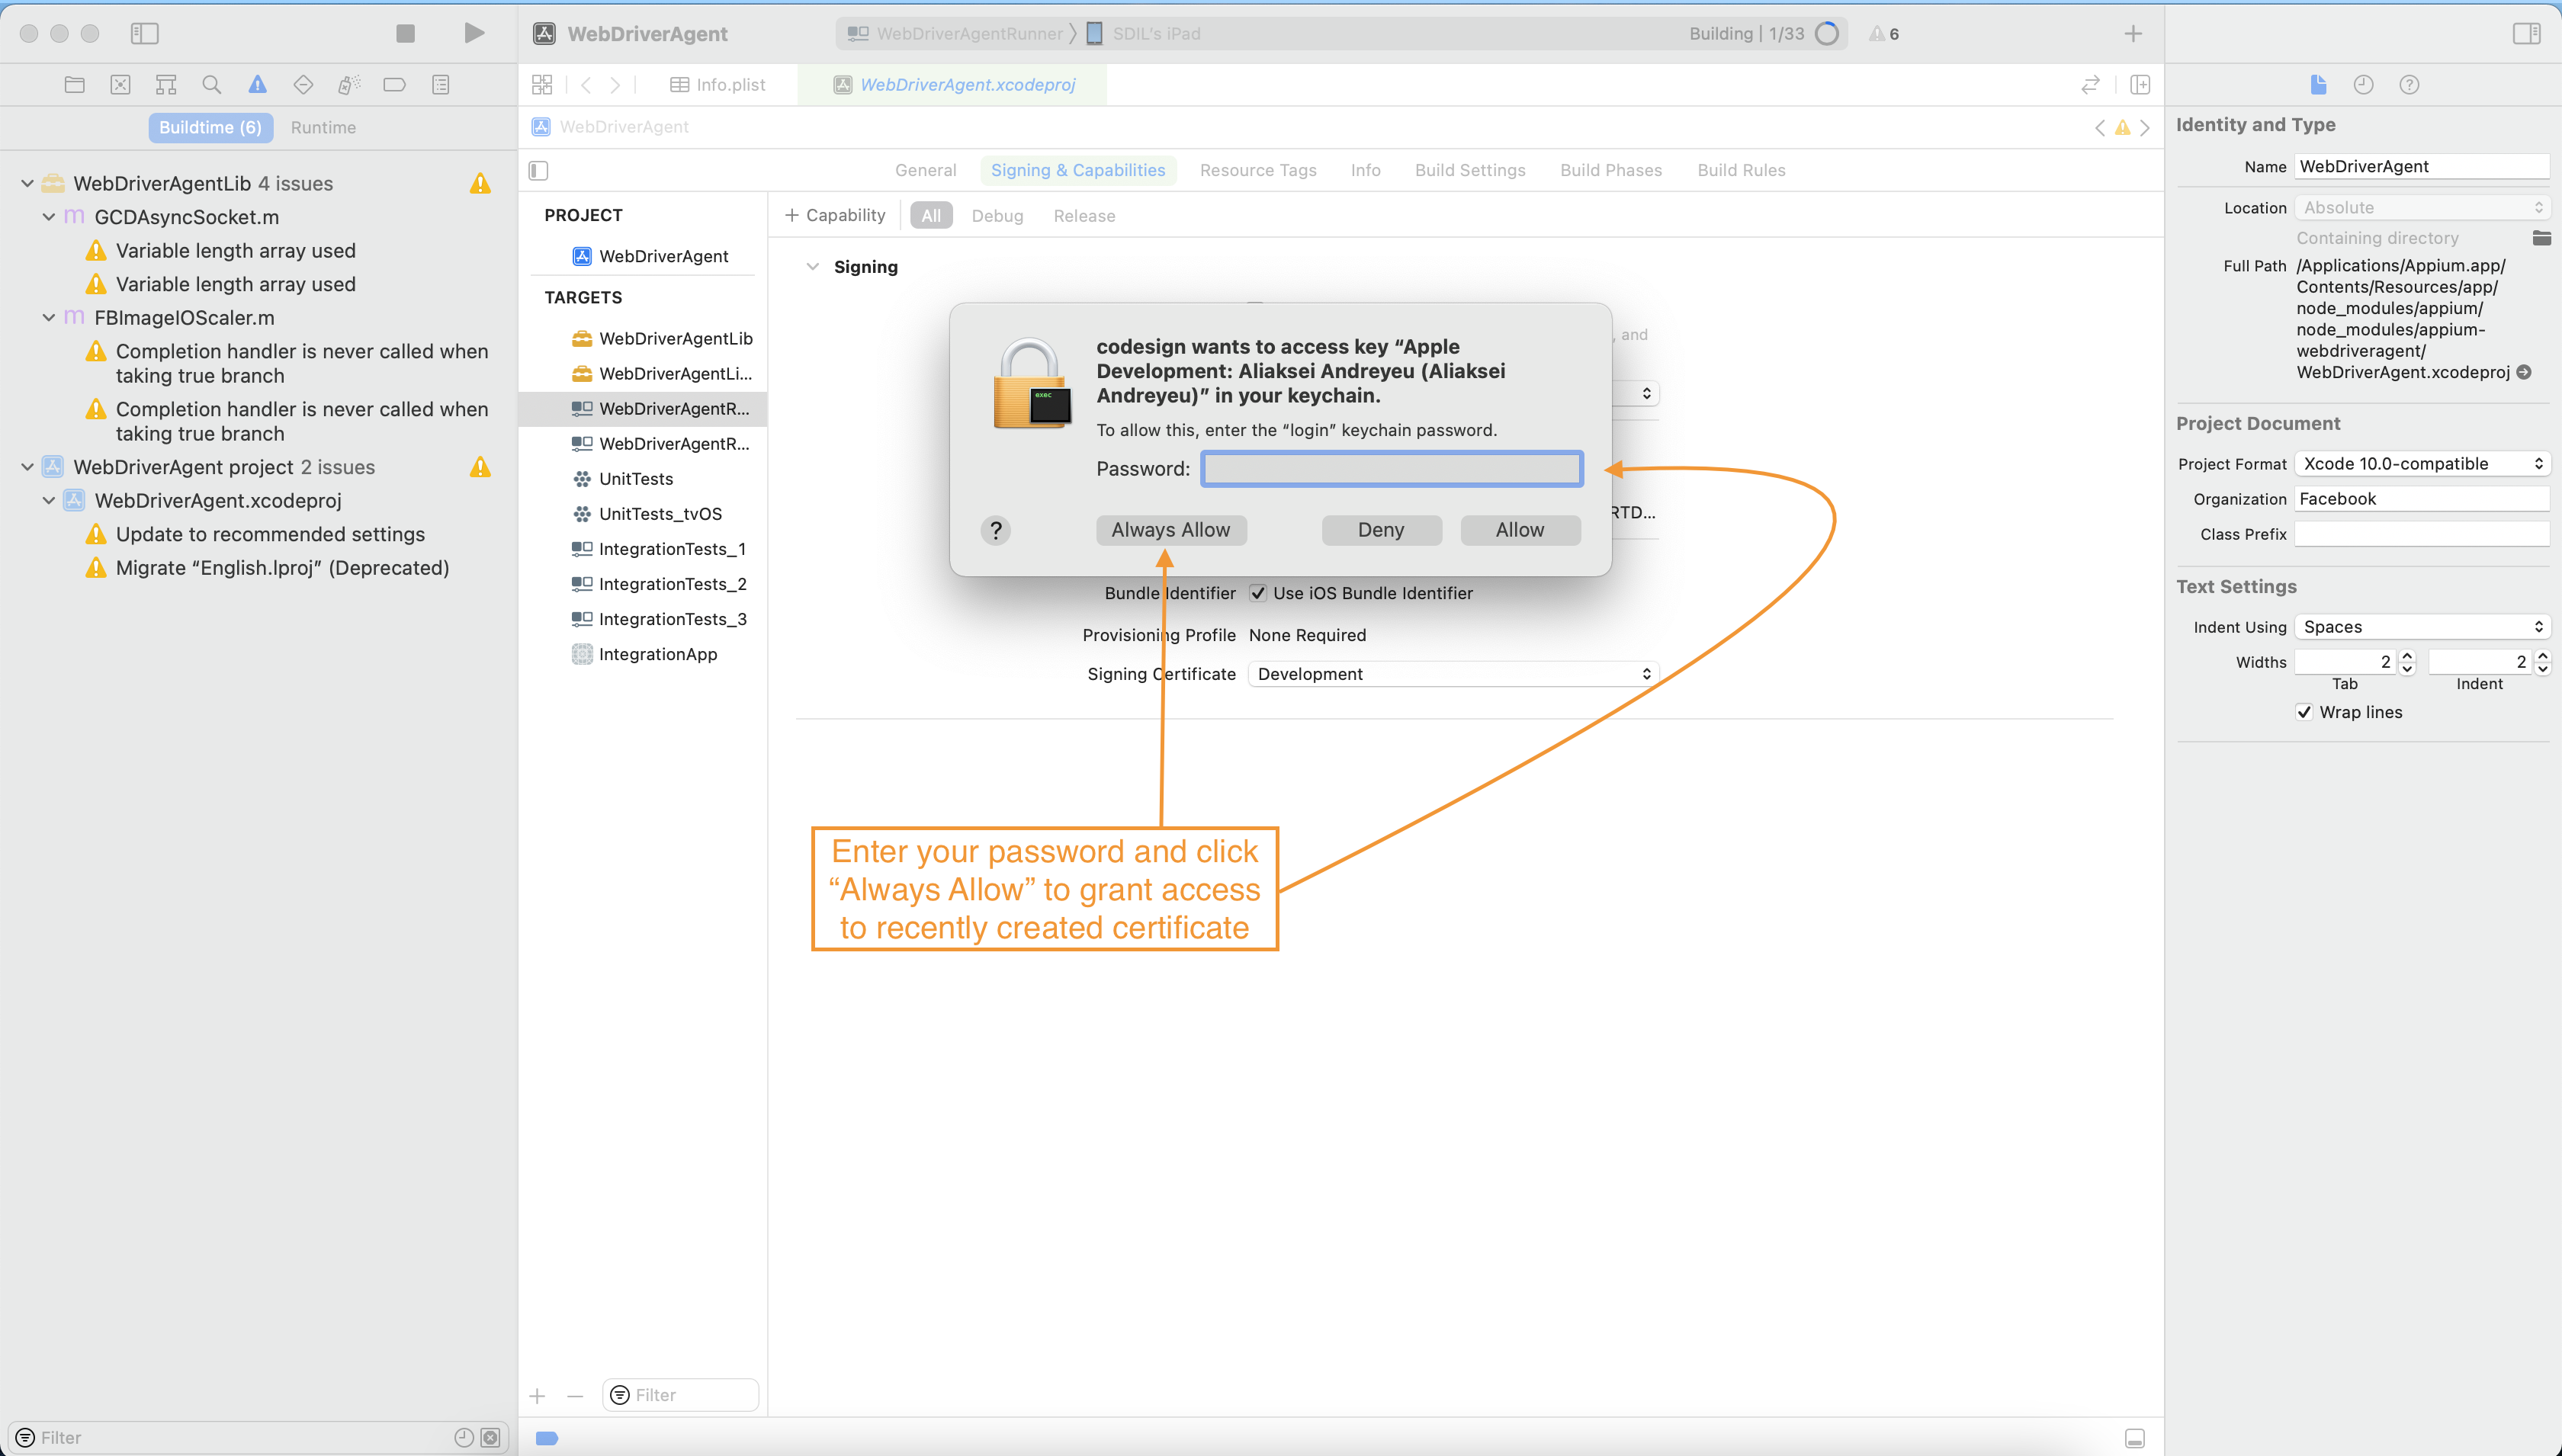
First start
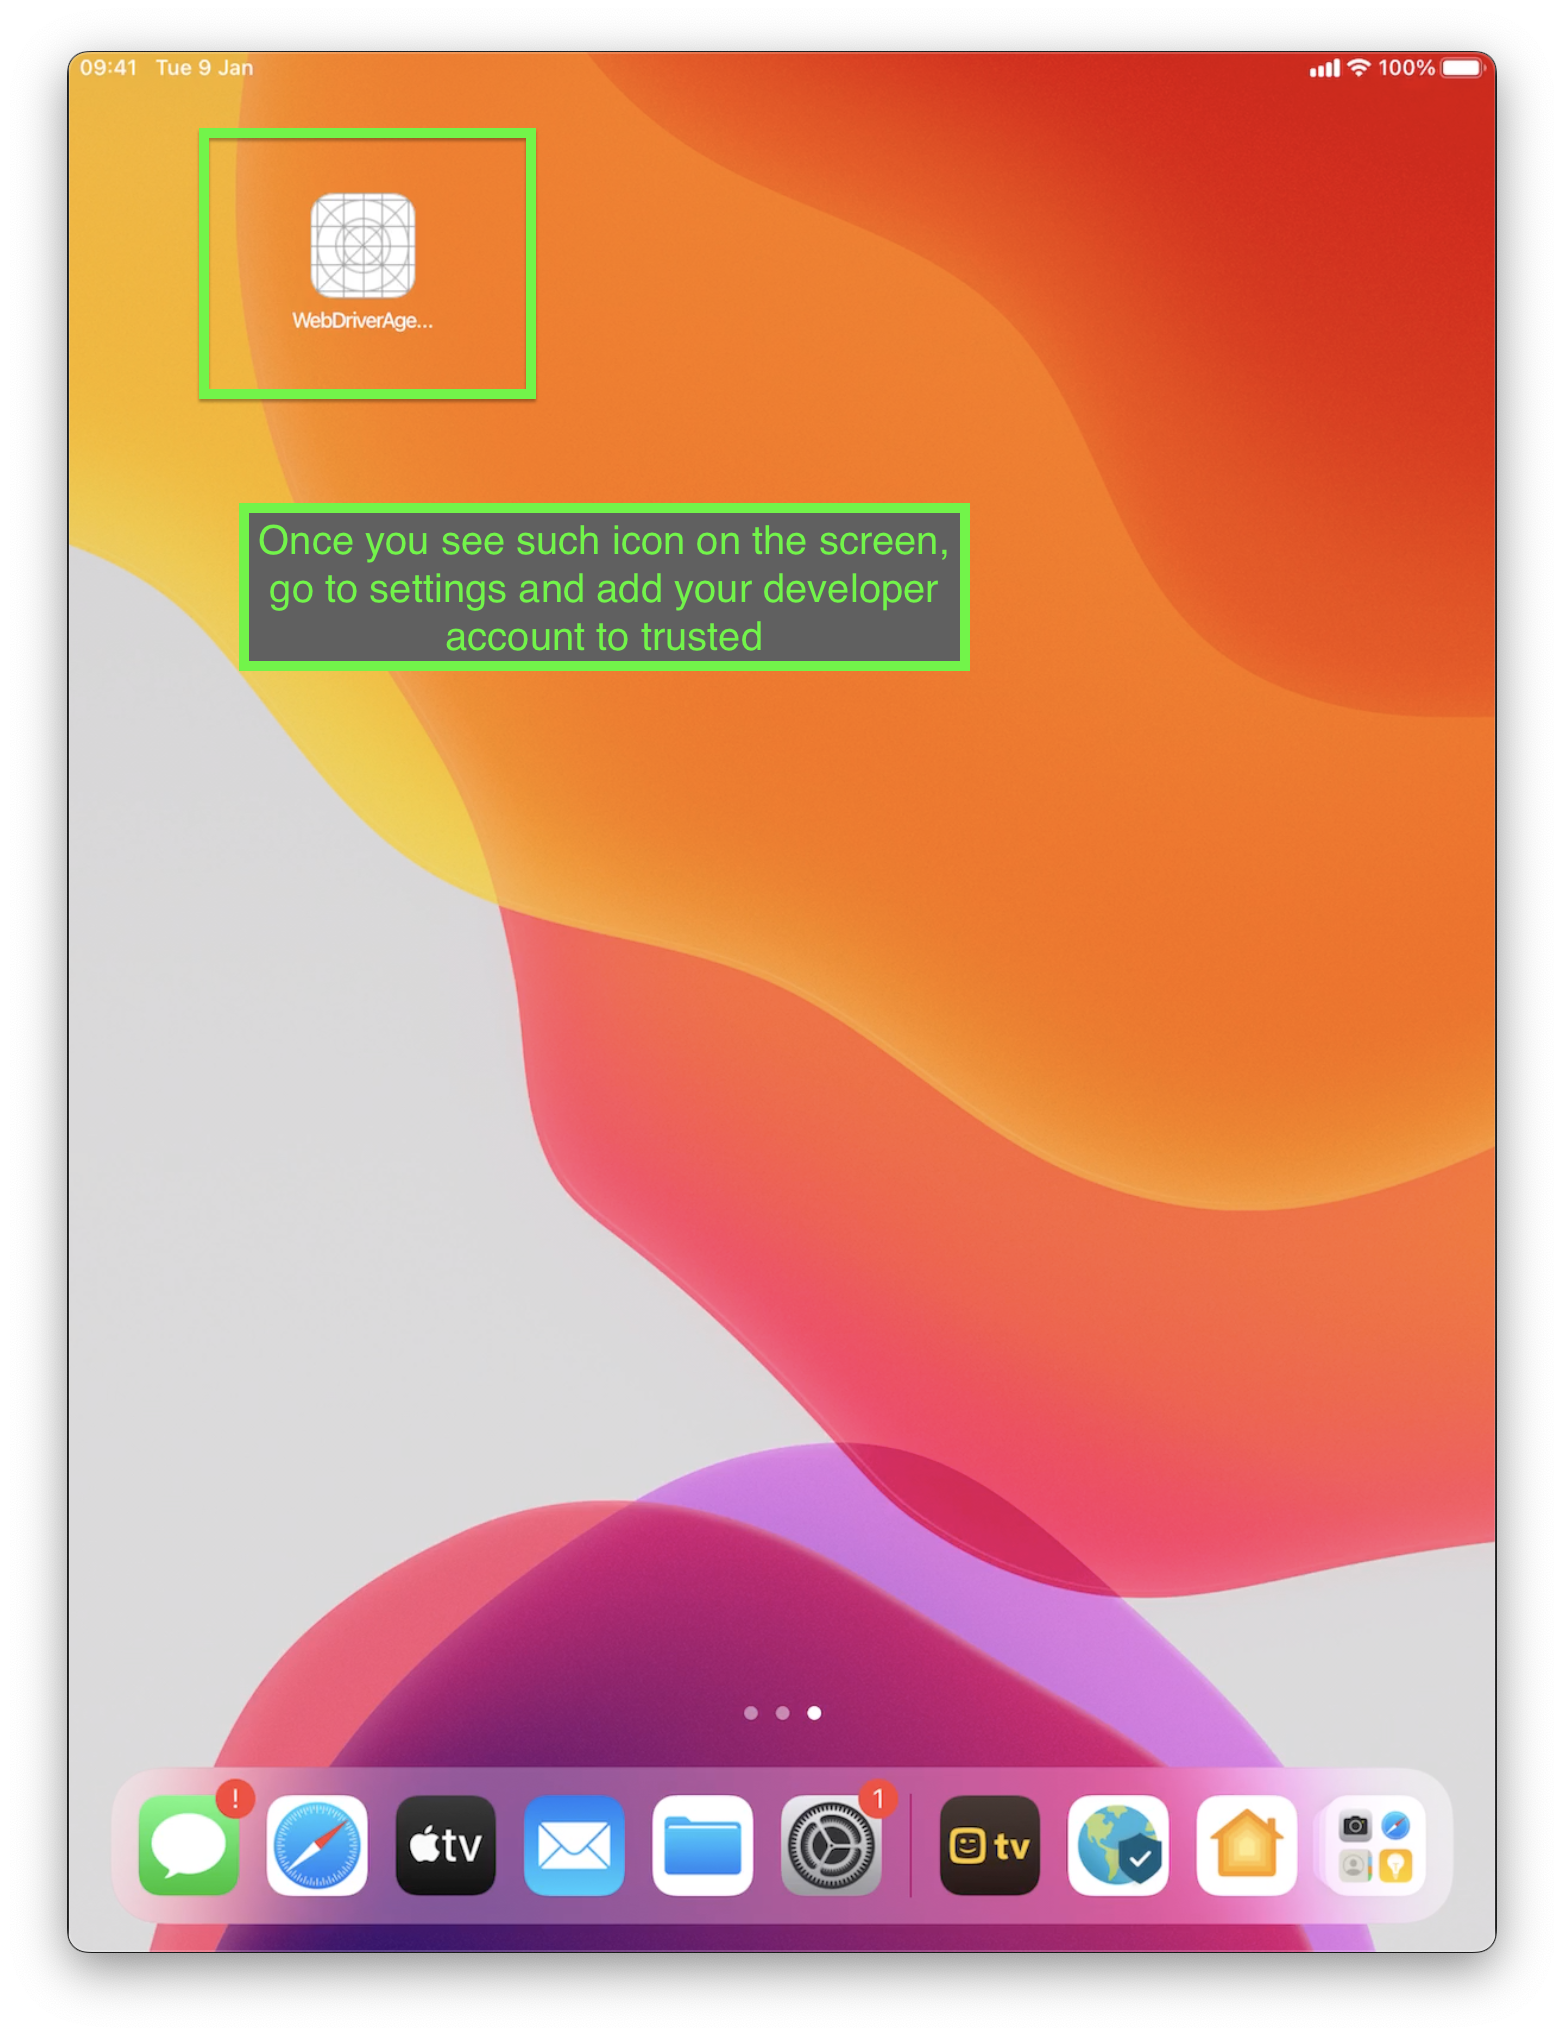
When all tools are installed and set up and all desired capabilities are defined, we can start our tests. For the first time, Appium will install the WDA application on the Apple device. Since WDA is signed with an unknown Apple Developer account, we need to add it to the trust.
Start the session either via Appium Inspector or by running an autotest. Once the WDA icon appears on the screen, do the following:
-
Go to Settings→General→Profile & Device Management (iOS 15 and higher - Settings→General→VPN & Device Management);
-
Tap on "Apple Development: "account name";
-
Choose "Trust";
Click to view screenshot
You are ready to run tests! Just add properties from above to your *.properties file and use the same approach as for Simulators
F.A.Q.
Why can’t I start the session with an Android device?
-
Make sure that the device is physically connected;
-
Check UDID capability(property). It should match the serial number of the device;
-
Make sure adb sees the device (
adb devices). In case the device is not on the list, try restarting adb server via terminal:
adb kill-server && \
adb start-server
Why can’t I start the session with an iOS device?
-
WDA is expired. This is the most common issue that appeared on iOS devices
Unable to launch WebDriverAgent because of xcodebuild failure: xcodebuild failed with code 65When it happens, the icon of the WebDriverAgent disappears from the device menu. To get it back on the device you should rebuild WDA for your device and add your developer account to trust again;
Use this guide to fix WDA expiration much faster -
Make sure that the device is physically connected;
-
Check UDID capability(property). It should match the serial number of the device;
It’s quite unhandy to add an Apple Developer account to trusted every time WDA is expired. Is there a more convenient way?
Yes. You can create the second application signed with your Apple Developer account. Once WebDriverAgent get expired, it will be deleted. But your second app will remain on the device and keep your Apple Developer account in the trusted list. You will only need to rebuild WDA in a click to get it back.
Click to expand steps
-
Make sure your device is connected to your workstation;
-
Open Xcode and create a new project;
-
Choose Application type "App" for your platform;
-
Enter Product Name, let’s say "keeper";
-
Use the same Team and Organization Identifier that you used for WebDriverAgent;
-
Click Build;
Now your mobile device has the keeper application installed. It will remain on the device even when WDA is deleted due to expiration. When it happens, just connect the device, open the WDA project and click build. After the build is successful you can start your Appium sessions again.
How to pair AppleTV with MacBook?
-
Make sure your computer and Apple TV are connected to the same Wi-FI network.;
-
On Apple TV go to Settings→Remotes and Devices→Remote App and Devices;
-
On your Mac open Xcode→Window→Devices and Simulators (⌘+2);
-
Click " + " on the tab "Devices" to add a new device.;
-
Choose your Apple TV from the list;
-
Enter the 6-digit passcode that appeared on the TV screen;